Filmora9 by Wondershare is indeed a great video editor that is being greatly undervalued. In this article, we are going to review all the fun stuff about this program.
While this tool is designed mostly for amateurs in video production, it’s not just an entry-level video editor anymore. Every major release of Filmora by Wondershare is getting a huge chunk of extra features. The ninth release has so many great tools included, so we now recommend Filmora as a cheap alternative to the famous Camtasia by TechSmith.
Filmora 9 has now become my personal favorite tool when it comes to the quick creation of a cool-looking dynamic video. Currently, I’d say this software is unbeatable in terms of built-in effects, animated text intro templates, and complex inter-clip transitions. You simply can’t find any other video editor that offers so many media items that you can start using right away. This is just so generous from this developer.
Filmora 9 review in a nutshell. Introducing the User Interface.
As soon as you launch the latest Filmora version, you will start noticing all the assisting elements that are really helpful for a complete beginner.
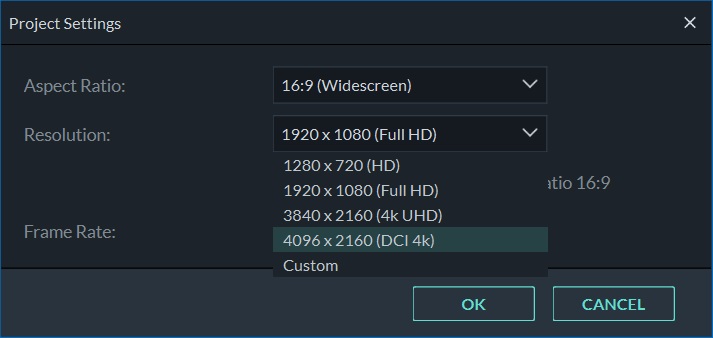
The first screen that you are presented with – is usually an aspect ration selection, along with the options to either create a new project from scratch or to open an existing piece of your art for further improvements.
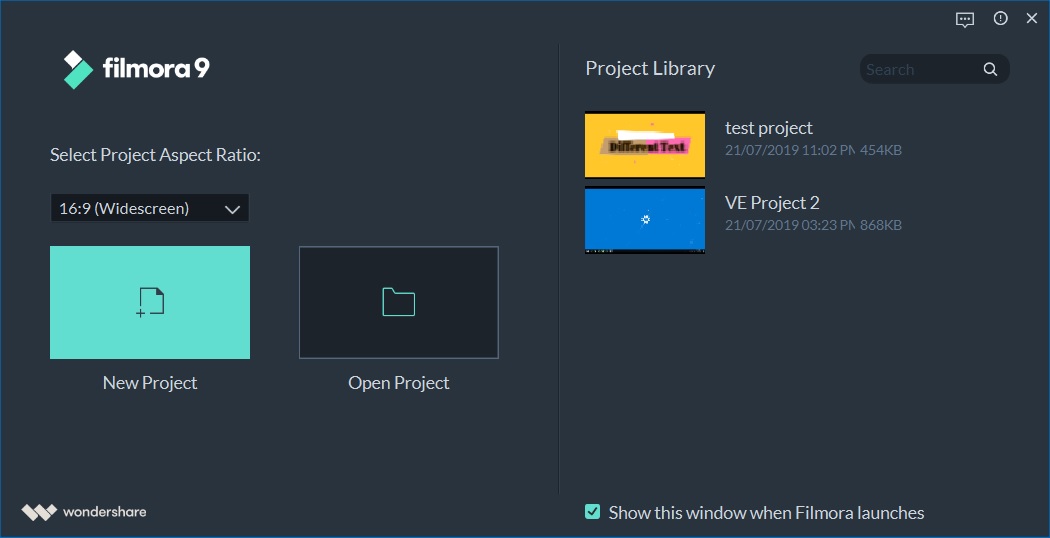
You can choose one of the multiple popular and modern aspect ratios (we will get into details about available formats later on). In case you want to open an existing project from the external device, or just some project that you’ve moved from another computer – you can always select the “Open Project” option. Otherwise – there will be all the recently created projects, listed in this window.
If you prefer to start with some default, most commonly used by you, aspect ratio – feel free to uncheck the “Show this window when Filmora launches” option – and you’ll be getting straight to the next screen on every launch.
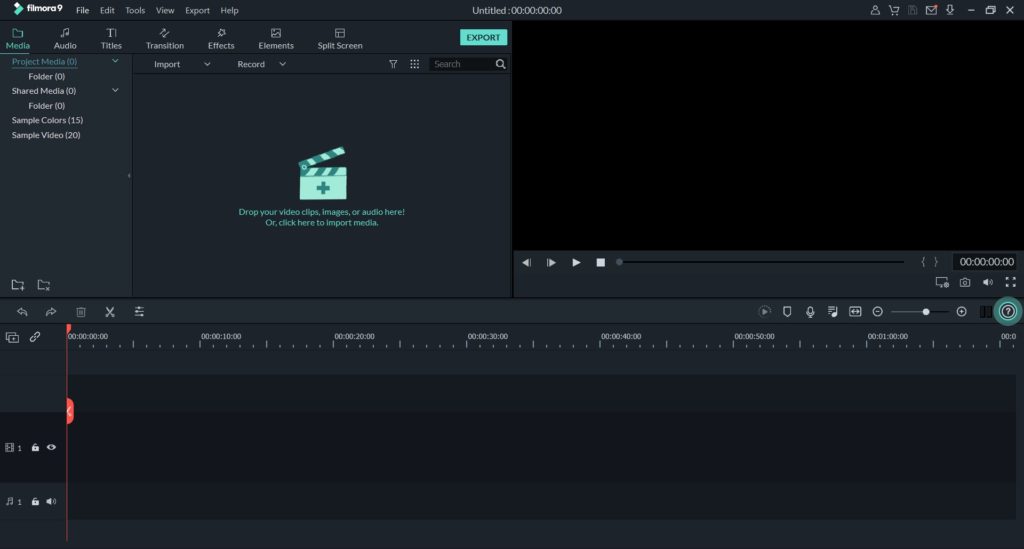
As you can see, Filmora offers a well-defined user interface layout with all the commonly used tools available right in front of you. For those of you, who never worked with Filmora products before, or just starting to use video editors, I am going to have a brief overview of the main user interface elements.
Media files dashboard
If you focus your attention on the top left section of the Filmora’s window, you will see some sort of dashboard that allows you to select different types of media files, depending on the active tab on the top toolbar of the dashboard.
You can select one of the following modes for the media files dashboard:
- Media, Audio
- Titles
- Transition
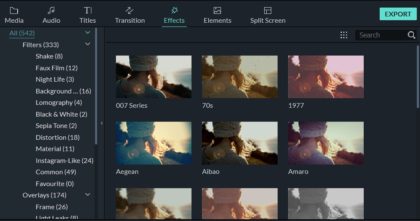
- Effects
- Elements
- Split Screen
I am going to cover every one of those in more detail further in this article. Now let’s just have a brief overview for easier understanding.
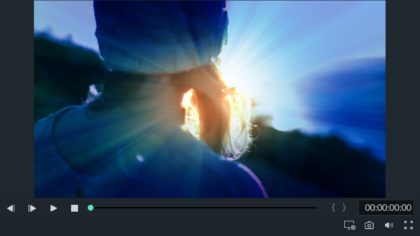
Preview Window
While working with your footage, you will most likely want to preview all those cuts, slices, and transitions you’ve made. Besides that, every single media file from the previously discussed dashboard can also be previewed prior to being applied to your project.
Here you have a preview window, which is located in the top right corner of Filmora’s window.
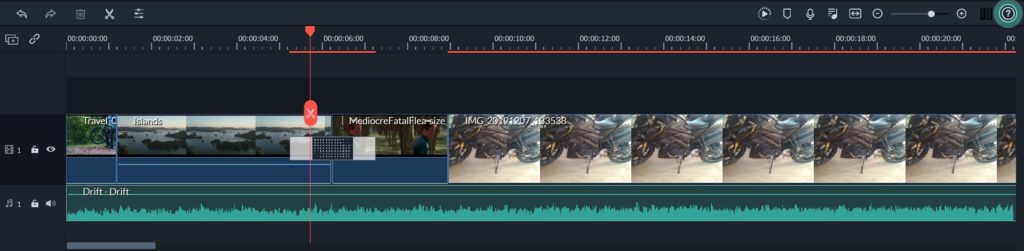
Timeline Editor
The third most important part of the Filmora 9’s UI – is the Timeline Editor. You can get access to all of the tracks (audio, and video) and all the edit operations on them. You can: cut, split, copy, paste, adjust separate clips. Also, you can add additional tracks, zoom-in, and zoom-out the entire timeline, and rearrange the tracks and clips in them.
Main Menu Bar
It’s pretty obvious, any desktop application would always have one. Still, I think it’d be nice to also mention a menu bar of Filmora’s window here for the sake of consistency.
![]()
Besides some of the standard menu items, you are also getting the information about the total project length, and some additional icons like:
- account
- purchase
- save the project
- messaging center
- download more effects
Filmora 9 detailed review of core features
Now, as you are familiar with the user interface layout and elements, let’s dive deeper into Filmora’s most important features that make this tool capable of doing wonders in video editing.
Currently, it’s a complex task, when trying to explain all the parts of this program in a very detailed manner. The ninth release has added a lot of new stuff, and we won’t be covering everything. I suggest you visit the official site, and try Filmora 9 for free, so you can get a better idea of what’s inside.
Having that said, let’s talk about core parts that make Filmora one of the best video editors you can currently get.
Chroma Key
Is a must-have effect when creating Hollywood-grade video edits. Previously, the green screen effect was only available inexpensive, professional software. Now, Filmora 9 also offers these amazing features and it works really really well.
All you need to do is just import 2 video clips: a green screen clip, and a background video clip to your Filmora project, and select a “green screen” option on a first clip.
Then you can adjust some important settings that affect the way your resulting video is going to look and apply the Chroma Key effect. All you need to do as your final step – is to export (or render) the project.
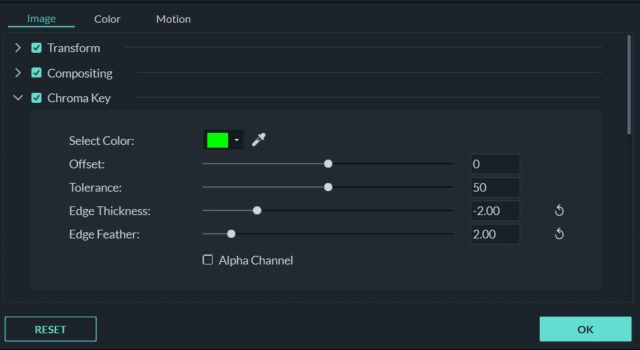
You are free to adjust the following green screen settings:
- Edge Thickness
- Tolerance
- Offset
- Edge Feather
In addition, you can also choose which color you want to use for a Chroma Key processing. Keep in mind, the green color is recommended when making a video with humans, because of the best contrast between green color and the skin tones.
Filmora9 makes it so much easier for an entry-level video editing enthusiast to enter the wonderful world of special effects.
Advanced Color Correction
This feature from Filmora9 allows creating a lot of dope video styles. You can adjust so many small details, so it becomes an endless feature for different color schemes.
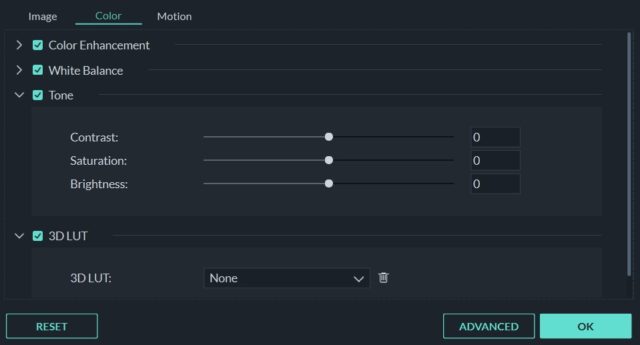
The color correction allows the adjustment of the following options:
- White balance
- Color enhancement
- 3D LUT
- Lighting
- HSL
- Vignette
Besides fine-tuning options, you are also offered with a number of presets to make your video look like a 007 series, or to have a color scheme of one of the Star Wars episodes. You can also create and store your own presets.
4K Editing
Days, when 4K video was considered as something unusual, are now gone. Ultra HD video resolution is now widely accepted, and even YouTube supports it. 4K monitors are now available for much lower pricing than before. It’s a very common video standard and it’s a shame when you are not able to create your videos in UHD quality.
Thanks to Filmora9 – you are getting a full-featured 4K video editing tool. Just select a proper resolution inside Filmora, and you are good to go with 4K. Keep in mind, your media files must also be in 4K if you want to create a professional quality video.
All the effects, transitions, and text overlays are going to adjust to a high-res video project. You don’t have to take any additional actions if you have a 4K monitor, and a Filmora9 installed in your system.
Be advised: for high-res videos, you’d probably need to make sure you have enough of free disk space. Besides that, having a fast CPU is going to be really helpful for this type of video. It also worth having at least medium GPU, so Filmora9 can take advantage of your hardware when rendering and previewing the 3D effects.
Enhanced Video Stabilization
If you ever had that shake footage from your action camera or a drone – you’ve most likely been wondering if there is a way to fix this problem. Indeed, when you already are done with shooting the video, there is almost never a chance to create a better, more smooth footage right away.

Filmora9 is a great tool for making a shaky video look much more stable and smooth. Thanks to enhanced video stabilization, you can remove slight to greater shakiness. The best part is – you don’t have to know any special video editing skills or techniques. Everything is done easily, within the Filmora’s user interface.
Speed & Duration Adjustment
Whenever you want a timelapse or a slowmo effect – Filmora9 is here to provide one of the best user experiences. You can always change the playback speed of any single piece of your video track by simply splicing it, and setting up the duration values in the dialog.
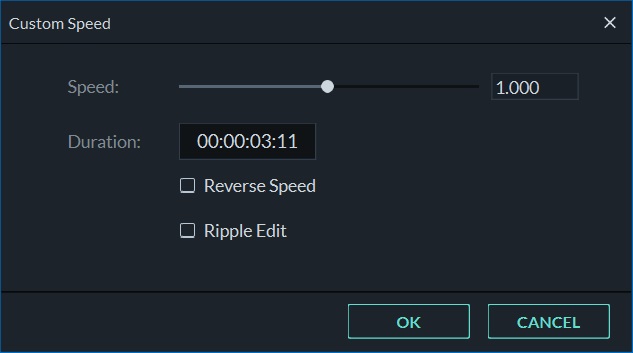
In addition to the speed settings, you can easily create a reverse playback effect by simply checking one checkbox in the dialog.
Screen, Webcam, and Microphone recorder
If you’re planning to create an educational video from your monitors’ screen, or maybe you want to make a presentation for your business – Filmora9 makes sure you will get the job done.
This particular version of Wondershare’s Filmora (not to confuse with Filmora Pro) has a built-in Screen Recorder. Besides that, you can choose to also record your microphone and/or web camera.
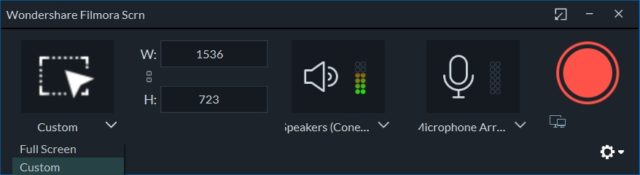
Making a screen recording is easy and is very adjustable. You can choose to either record the entire screen area (aka full screen), a specific part of the screen, or an application window of your choice. Adding a mic or a webcam input is always up to you.
Besides that, you can also choose to just record your microphone, to create a nice voice-over.
Split-screen layouts
Filmora9 is a very unique video editor in terms of special features. Just take a look at their split-screen function. You can choose one of the many layouts to play from 2 up to 6 video clips simultaneously. They will all get played in a small separate viewport, making it easy for you to create a stunning and eye-catching movie.
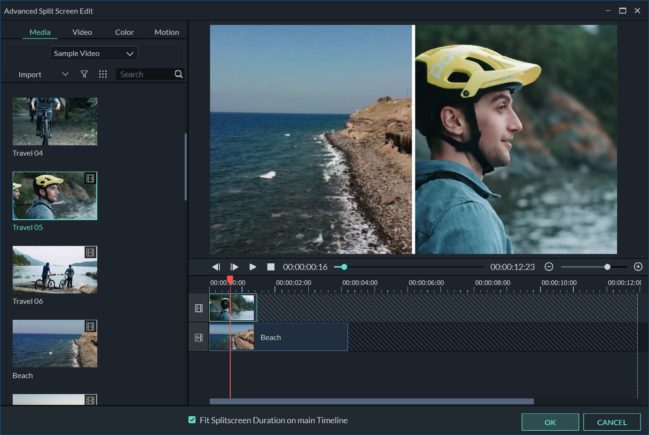
If the built-in layouts are not enough for you – there are a lot more split-screen templates available from Filmora’s stock media site. Just head in there, and download whatever you need.
Filmora9 review. Main highlights. Extra features.
Now, after we had most of the core of Filmora’s functional parts reviewed, let’s try to make a brief summary of what this software is capable of, and what are some of the extra features, offered by this wonderful tool by Wondershare.
- 100 tracks can be used in a single project (video, audio, and images)
- 4K video editing and 4K video preview
- 230+ transitions included (more can be downloaded from Filmstocks web-site)
- More than 540 effects already in, while you can also download additional effects from Filmstocks
- 190+ Filmora elements (animated text and image overlays) are in, while others can also be downloaded
- 30+ Split screen layouts included (additional templates can be downloaded)
- 250+ animated text titles for intros, episodes, and credits (you can download more if needed)
- 15 sample colors and 20 sample videos included, with other samples can be downloaded from Filmstocks
- More than 50 royalty-free music clips included
- Screen, web camera, and microphone recorder
- Advanced color correction (Vignette, White Balance, 3D LUT)
- Enhanced video stabilization
- Improved, precise Chroma Key
- Clip speed and duration adjustment
- Audio editing tools (fade-in/out, pitch, denoise, equalizer, volume)
- Modern aspect ration modes (including 1:1, and 21:9)
- Render preview can be created for smooth playback in the preview window
- Lots of supported import and export formats (including: .mpg, .mpeg, .m1v, .m2v, .mp4, .m4v, .3gp, .3g2, .3gp2, .mov encoded with H.264, MPEG 4 or MJPEG codec, and much more)
- Pan and zoom effect with key-frame animations
- Fast rendering
- Very stable operation (it’s never crashing in the middle of editing)
- Easy for an absolute beginner to start with this tool, without any guidance
What is the difference between Filmora9 and Filmora Pro?
While most of us will be happy with just Fimlora9 – there is another product from Wondershare called FimoraPro. The latter can be thought of as the next level in video editing. It features all the best stuff from Filmora9 while adding a crazy set of additional tools, and more levels of adjustments.
If you’re interested in a full comparison between FilmoraPro and Filmora9 – feel free to read our new article that highlights the maind distinction between these two video editors.
FilmoraPro is an older brother for Filmora9. While its main audience is professional video creators and filmmakers, because FilmoraPro is aimed to replace the more expensive Adobe Premiere software, it’s still easier to use than most professional tools. FilmoraPro adds significant complexity in the way you will be editing your videos, but still it provides a well-designed user interface that is more user-friendly than other similar tools.
FilmoraPro will offer additional adjustments, and detailed key-frame based animations. It will also offer a bigger selection of effects and transitions. User Interface is going to look and feel much more like Adobe Premiere and similar professional video editing software, while still having an easy to use the approach from Wondershare.
Having that said, if you’re planning to get FilmoraPro – it’s going to cost a bit more compared to Filmora9. Nevertheless, FilmoraPro is still way cheaper than other comparable programs. I’d say – you must definitely consider FilmoraPro as your professional editing tool, especially if you are on a budget.
Now, let’s list the main features that you will get if you decide you to start using FilmoraPro instead of Filmora9:
- Unlimited number of tracks
- Advanced track editing (split tool, splice tool, roll edit tool, ripple edit tool)
- Improved automatic stabilization
- Motion tracking (attach text or graphics to a moving object in your video)
- Apply key-frame animations to every single object in your frame
- Masking with custom shapes (allows yo hide a specific part of your video)
- Auto-correction (will determine the ideal settings for the image or vide0)
- Fully-customizable video effects with adjustable properties
FilmoraPro will suit best for an intermediate to advanced users that are going to spend a lot of time editing their videos to make them look precisely as needed. A lot of additional, complex options, are added into FilmoraPro, compared to Filmora9. If you are ready to devote more time to fine-tune your final result – FilmoraPro is for you.
If you’re looking for a quick video editor with some nice drag-n-drop effects and transitions – Filmora9 is for you. It’s also going to cost less.
Supported platforms
We have the Good News here! Wondershare made their products in such a way so they are compatible with both Windows and macOS. Also, you can transfer a project from one OS to another. Both Filmora9 and Pro support this option.
Pricing plans and discounts
Filmora9 is currently available for a one-time payment single license for just $69.99!
You can also choose to pay every year, and this will cost you just $39.99 annually. This option is a bit weird, as it does not include any benefits, it just makes it possible to use Filmora9 for much cheaper, but you will pay more eventually.
If you are up for the annual plan – the recommended option is to choose a $99.87 payment plan. In this case – you will have unlimited access to a Filmstocks library, and new effects every month.
What about FilmoraPro?
If you were intrigued by a comparison between Filmora 9 and Pro versions – you might also be wondering on how much does it cost to get FimoraPro? Well, the answer is below.
A one-time license for FilmoraPro will cost you $149.99!
Another option – is to get the annual subscription for just $89.99 per year! This makes the starting price way cheaper but will become more expensive along the way.
Is the upgrade from Filmora9 to FilmoraPro possible?
Great News! If you purchased a Filmora9 already, you can upgrade to the FilmoraPro license later. Just send an email to Wondershare and ask for an upgrade. They are going to reply to you with all the details.

