Choosing between Movavi and Filmora is not easy. Both editors offer a large set of tools and a nice UI that makes it really hard to compare them.
But, let’s not give up just now, and try to dive deep into finding similarities and differences of these great programs.
Wondershare did an amazing job of delivering a feature-reach consumer-level video editing software. Now, you don’t have to spend a fortune before you can get started with creating neat video projects.
Movavi did exactly the same. They’ve developed a wide range of beginner to professional level video editing programs. Price-wise and feature-wise, Movavi is on par with Wondershare.
Nowadays, both Filmora and Movavi offer a lot of entry-level and advanced features. These include effects, transitions, animated overlays, video track modifiers, audio editing, and so on.
Because both developers are in a constant race of competition, it is a challenge for us, users, to decide which video editor is the best match for us.
In this article, I will make another attempt to compare Movavi versus Filmora. The main goal of this write-up is to make it easier for you to pick the video editor, based on your needs, experience, and budget.
The first step of distinguishing Filmora and Movavi is to learn some of the most important info about both products.
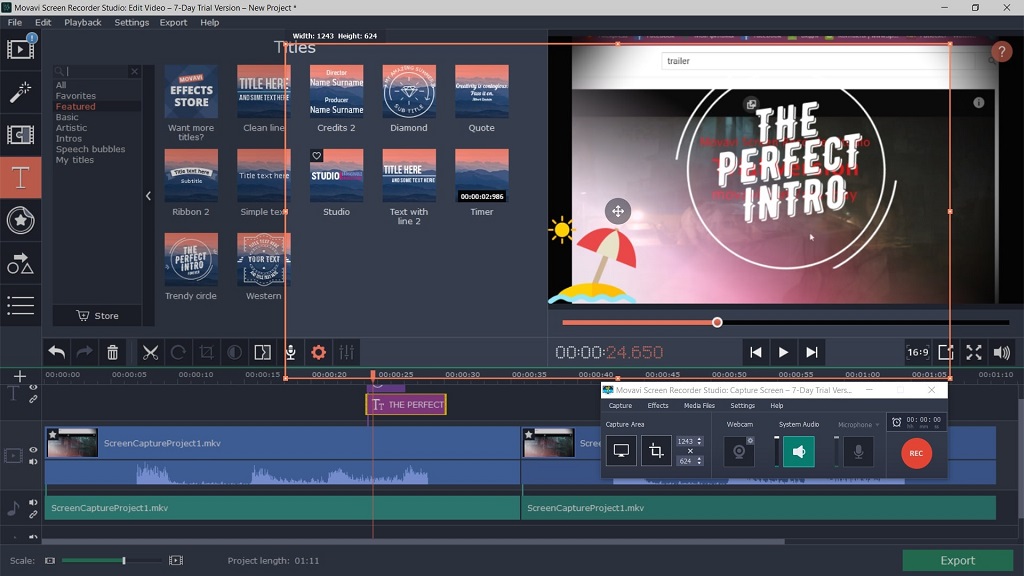
Movavi Video Editor
![]()
Highly acclaimed beginner-level video creation software that really beats everything else in its niche when it comes to user-friendliness. Indeed, Movavi did a lot of research that helped them to deliver an intuitive and fast to learn video editor.
Movavi does an amazing job when all you need is to just get that video project done right now. There is no need to figure out all those fancy tricks used by professional video makers. With Movavi, your video is going to be ready in a matter of minutes.
You may be getting discouraged when I tell you that Movavi is targeted at novice users. This could make the impression that you can’t achieve much with Movavi. But, this is not true. Movavi offers literally tons of useful features that will make your resulting video look like a pro-level production.
Depending on which version of Movavi you purchase, the set of features may be different. You can always check their website to get a detailed comparison between the different versions of Movavi Video Editor.
Having said that, let’s have an overview of what’s inside Movavi.
Even the basic version offers 105+ transitions.
There are more than 150 filters included in Movavi Video Editor and even more available in the Plus version.
45+ text titles and animated overlays are here to make your video more informative and to make it stand out.
There is also a bunch of stickers and cool-looking shapes available out-of-the-box.
In case the included media elements are not enough you can bring even more diversity by visiting the Effects Store. From there you can buy additional filters, titles, shapes, etc. There are new items being added to the store regularly.
Plus version allows you to have up to 99 tracks on a timeline, while the basic Movavi version only comes with 6 tracks.
There is also a LUT feature but it is only available in Movavi Plus.
Every version of Movavi includes an easy to use Video Stabilization feature to help you reduce shakiness in your dynamic footage.
It is also nice that Movavi comes with a Chroma Key tool. Put a green screen behind you, record a video of yourself talking, and replace the green background with some cool video of a waterfall, or a cityscape.
Movavi also provides a few intro videos, sounds, music, and backgrounds. There are not too many of these included in the installation package, but you can download more from the Effects Store.
Every video needs sound. In most cases, you will also want to modify the audio track or add a voice-over. Movavi provides a set of basic audio editing features. There are just a few sound effects, and an equalizer. I’d wish this part improved.
Similar to most entry-level and professional video editors, Movavi provides a bunch of the most popular timeline editing features like split, crop, slow-mo, pan-and-zoom.
You can adjust the color theme of every video track or a part of a track using sliders along with automatic presets that enhance your video by adjusting white balance, contrast, and so on.
Unfortunately, a lot of advanced features like key-frame editing, detailed filter adjustments, audio synchronization, LUT, and a bunch of others are only available with Movavi Video Editor Plus, which costs more.
Pricing
Currently, Movavi offers a Video Editor Plus lifetime license for just $59.95. A cheaper plan is also available but you’ll have to keep renewing your subscription every year. You can learn more info on Movavi’s website.
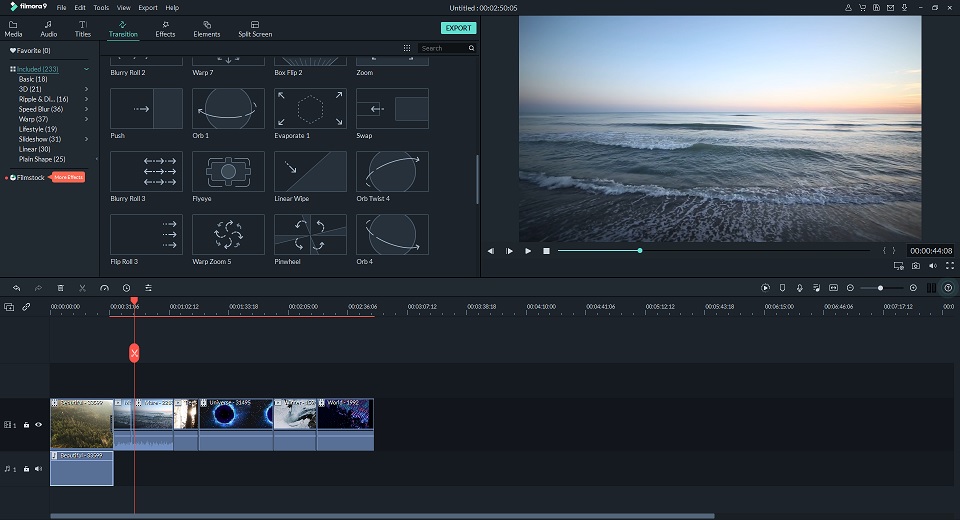
Filmora by Wondershare
![]()
If you don’t mind spending extra time to learn how to use this video editor, Filmora is going to provide you with even more creative freedom.
While this program is still aimed at a consumer-level audience, it allows significantly more customization of every video you create. Compared to Movavi, Filmora supports more fine-tuning of every effect and transition. This allows you to create a unique style and mood for your edits.
Filmora has stylish UI and is easy to get along with. Even if you’ve never been using any video editors before, Filmora is going to make sure you can get yourself ready in under 30 minutes. It can take less, depending on what you want to create with Filmora, and what your video editing skills are.
Usually, you’d start with a Media tab where you can import your footage. Then you can proceed by going to either Titles, Transitions, Effects, or any other of 7 tabs. The process is very streamlined and once you grasp all the details, it’s going to be quick and easy for you to create any sort of video.
To make sure your edits look diverse and up-to-the trend, Filmora comes with 280+ built-in effects, 230 transitions, and 250+ titles. There are a lot more of those available via Filmstocks online store.
Filmora comes with a very useful split-screen feature. 30+ layouts are available from the start, while extra templates can be downloaded from Filmstocks.
Filmora9 video editor
You will also enjoy Filmora elements. Those are animated overlays with texts and images. You can position, rotate, and scale every element. Multiple elements can be placed in the same or different video tracks.
Speaking of tracks, you can have up to 100 audio or video tracks per project in Filmora9.
A very nice and useful feature called Audio Ducking allows you to easily fade background music so your dialogue becomes audible.
Audio editing is also supported by Filmora. Similar to Movavi, Filmora9 provides only the basic equalizer and fade-in/out effects. A lot more audio editing features are available in FilmoraPro.
You are also getting color adjustment features like color match and color grade. There is even a LUT tool available. You can choose to adjust colors manually or use one of many built-in presets.
The timeline provides support for the most popular modifications. You can trim, crop & zoom, ripple delete, add freeze frame, and change the duration of the whole or a part of the video track. Half of the video track editing features are also available for the audio track when it makes sense.
If you want to greatly improve your footage, you can use Video Stabilization, Lens Correction, Auto-Enhancement, or apply a Drop Shadow effect. These tools are available for use from the timeline, as well as from the Tools menu in the toolbar.
Filmora would not be that cool if it didn’t offer a Chroma Key tool. It is easy to work with and creates great results. This is something that you can rarely find in other beginner-friendly video editors (except Movavi).
If you prefer high-res videos and your device has at least 8 GBs of RAM, Filmora will amaze you with its 4K editing. It is available out-of-the-box and is offered free of charge.
In case you don’t have all the needed media but would rather create it from scratch, Filmora can help you to achieve what you want. Filmora9 comes with a built-in screen recorder, voice-over recording tool, and web-cam recording. This makes Filmora awesome for creating online lessons or tutorials. This also makes Filmora stand out comparing to Movavi. The latter offers a screen recorder only as a separate product.
Another nice feature of Filmora – is motion tracking. It allows binding a media item such as text to a specific object in your footage. This comes in handy, especially when combined with keyframe animations. It looks just cool when you are able to create a pro-looking video with the motion-tracking elements right inside it.
Filmora9 can be downloaded and used for free without any expiration date. The only thing to keep in mind is your videos will all end up having a watermark unless you get a license. You’ll also need to create an account in order to be able to export your project even if you are still on an infinite free trial.
Pricing
Filmora9 will cost you $64.99 for a lifetime license. There is also a bit cheaper subscription-based package. This means you’ll be paying less, but will have to renew your subscription every year. Feel free to check the details on Filmora’s site.
If you are really up to a professional experience, you may as well get FilmoraPro for $129.99. This is a lifetime license. A subscription-based license is also available for $89.99 per year.
Movavi vs Filmora. Comparing side-by-side.
So far we’ve learned a lot of details about both video editors. Of course, it’s not possible to describe them in much greater approximation in this rather small article. However, we’ve learned enough to be able to compare Filmora and Movavi side-by-side. Let’s do it now.

Movavi
- Easy to use for an absolute beginner
- Fewer effects available out-of-the-box
- The user interface is easy to grasp with its big control elements
- No motion tracking
- 7-day free trial
- No screen recording (needs to be purchased separately)
- Basic animations of media elements (basic keyframes)
- Basic video stabilization included
- Chroma key
- No split-screen included
- Basic LUT and color adjustment settings
- Single media bin with no structuring
- Change of speed and duration
- Pand & Zoom, Crop, Ripple delete, and others must-have timeline editing tools
- No lens correction
- Aimed for absolute beginners (with ease of use and limited fine-tuning)
Filmora
- Some learning required before use
- A huge selection of effects
- The user interface is very sophisticated and may require some training
- Advanced motion tracking
- Unlimited trial period (with watermark)
- Screen recorder is included with every version
- Advanced keyframe-based animations
- Video stabilization is on a professional level
- Chroma key
- Split-screen with multiple layouts
- Advanced LUT profiles with presets and manual tuning
- As many as needed folders can be created
- Change of speed and duration
- Pand & Zoom, Crop, Ripple delete, and others must-have timeline editing tools
- Advanced lens correction included
- Aimed at advanced users (more fine-tuning available with a higher learning curve)
How do you choose between Filmora and Movavi?
After reading the comparison and an overview of both video editors, it should be pretty clear for you which program suits best for your needs. Nevertheless, let’s provide some useful tips to help you decide.
Use Movavi if…
All you need is just a simple video editor with big UI controls and straightforward usage. Movavi suits best for an absolute beginner that is not planning on becoming a pro. It costs less than Filmora, and you can start using it faster. The downside is fewer features and a lack of detailed video clip settings. You are also getting much fewer built-in effects and media.
Use Filmora if…
You want to get as much as possible out of an easy to use video editor. Filmora offers an amazing balance between simplicity and the quality of the final output. Generally, Filmora allows for the creation of more unique content. You’ll receive a lot of built-in effects and media elements that you can use in your videos. Filmora also allows for much finer tuning of every single effect and transition. If you want to go even further with your creative freedom – choose FilmoraPro instead of Filmora9. In this case, you’ll be using a video editor that is very close to Adobe Premiere Pro with its features.

